Quick Summary
Yes, most cracked slate floor damage can be repaired. Small hairline cracks and chips usually take about one afternoon to fix with a suitable stone filler or epoxy, followed by sealing. Cracks running through the full tile, loose tiles, or spreading damage may require replacing the tile or calling a professional.
- Hairline surface cracks are usually cosmetic and can be filled and sealed.
- Cracks through the full tile thickness may need the tile replaced.
- Find the cause of the crack first, or the repair may reopen.
- Epoxy handles cracks up to roughly 1/8 inch wide, while stone filler suits cosmetic repairs.
- Wait the full cure time before sanding or sealing the repair.
Table of Contents
- Can a Cracked Slate Floor Be Repaired?
- Repair, Replace, or Call a Professional: A Decision Guide
- Slate Tile Repair Kit: Materials and Tools You Need
- Step-by-Step: How to Fix Cracks in Slate
- Sealing Your Slate Floor After the Repair
- Booking a Slate Repair Assessment With Johnny Stone Work
- Frequently Asked Questions
Can a Cracked Slate Floor Be Repaired?
Last Updated: November 15, 2026
Yes, most cracked slate floors can be repaired, and a small crack usually takes one afternoon to fix. Slate and granite restoration is a common request, and the first question is often whether a cracked floor can be repaired or needs replacing.
Slate is a layered stone, so cracks often run along those layers. A surface crack is easy to fill. A crack that runs all the way through the tile, or a tile that has started to lift, needs more work.
Assessing the Type and Severity of Damage
Start by looking at the damage closely. Use a bright flashlight at a low angle so the cracks show up clearly.
- Hairline surface cracks: Usually cosmetic. They can be filled and sealed.
- Chips along the edge or corner: Often repairable with a stone filler.
- Cracks through the full thickness: The tile may need replacing.
Write down what you find, and take a photo. It helps when you compare repair options later.
Diagnosing the Cause of a Crack
Fixing the crack without finding the cause is a common mistake. If the cause stays, the crack often comes back.
- Heavy furniture or dropped objects: Usually creates a single impact crack.
- A shifting or uneven subfloor: Creates cracks that spread across several tiles.
- Moisture underneath: Can cause loosening and delamination over time.
If several tiles are cracking, check the subfloor before you repair anything. Repairs made over a moving subfloor rarely last.
Repair, Replace, or Call a Professional: A Decision Guide
Use this quick guide to decide your next step.
- Repair yourself if the damage is a hairline crack, a small chip, or one isolated tile with no movement.
- Replace the tile if the crack runs fully through, the tile rocks, or you can’t find a close match.
- Call a professional if you see delamination across a large area, cracks spreading across many tiles, or signs of moisture or subfloor problems.
If you’re unsure, a professional assessment can save money by avoiding a second repair attempt on the wrong problem. Visit the Johnny Stone Work website for current pricing or a free estimate before you spend money on materials.
Slate Tile Repair Kit: Materials and Tools You Need
Gather everything before you start. Stopping halfway to find a tool leaves the filler to dry in the wrong place, and a half-mixed epoxy can set before you get back to it.
- A stone-safe epoxy or two-part stone filler
- A matching colorant or pigment for the slate
- Fine sandpaper (around 220 grit) or a stone sanding block
Choosing Between Epoxy, Grout, and Stone Filler
These products are not interchangeable, and the right choice depends on crack width, whether the tile is moving, and how visible the repair will be. Most practitioners sort fillers into four families:
- Cementitious grout: Best for the joints between tiles, not for cracks inside a slate tile. It is rigid, shrinks as it cures, and rarely color-matches natural slate. Using it on the slate itself usually looks wrong and wears poorly.
- Two-part epoxy: The strongest and most waterproof option. It bonds well to clean stone and handles cracks up to roughly 1/8 inch wide. It is rigid once cured, so it works on stable tiles but can crack again if the subfloor moves. Epoxy also resists most penetrating sealers, so the sealer beads on the patch instead of soaking in.
- Stone filler or stone repair compound: Made for natural stone and easier to tint. It suits surface voids, chips, and hairline cracks where appearance matters more than structural strength. Many stone fillers are acrylic- or polyester-based and can be sanded and polished to blend with the surrounding slate.
Match the filler to the crack: hairline and cosmetic cracks take stone filler or a flexible sealant; cracks up to about 1/8 inch take epoxy or a layered stone filler; wider gaps and missing corners are built up in layers or the tile is replaced. Check the label for compatibility with slate and with the sealer you plan to use, because some epoxies and sealants reject penetrating sealers.
Matching the Color to Natural Slate
Slate varies in color, so test your filler on a hidden area or a scrap piece first. Mix a little colorant into the filler, let it cure, then compare it in daylight. Most colors look darker when wet, so wait until the filler dries before you judge the match. Add small amounts of colorant at a time. It is easier to darken a filler than to lighten it.
Step-by-Step: How to Fix Cracks in Slate
Follow these steps for a clean, durable repair. Work in a well-ventilated room and keep children and pets out until the repair cures. Set aside about two hours of active work for a single crack, plus the full cure time on the label, which is commonly 24 hours for epoxy and 24 to 72 hours for stone filler.
Safety and Preparation Before You Start
Protect yourself before you open any product. Wear gloves, eye protection, and a respirator rated for solvent and epoxy vapors.
Clear the area and tape off the surrounding tile with painter’s tape. This keeps filler off the surface you aren’t repairing.
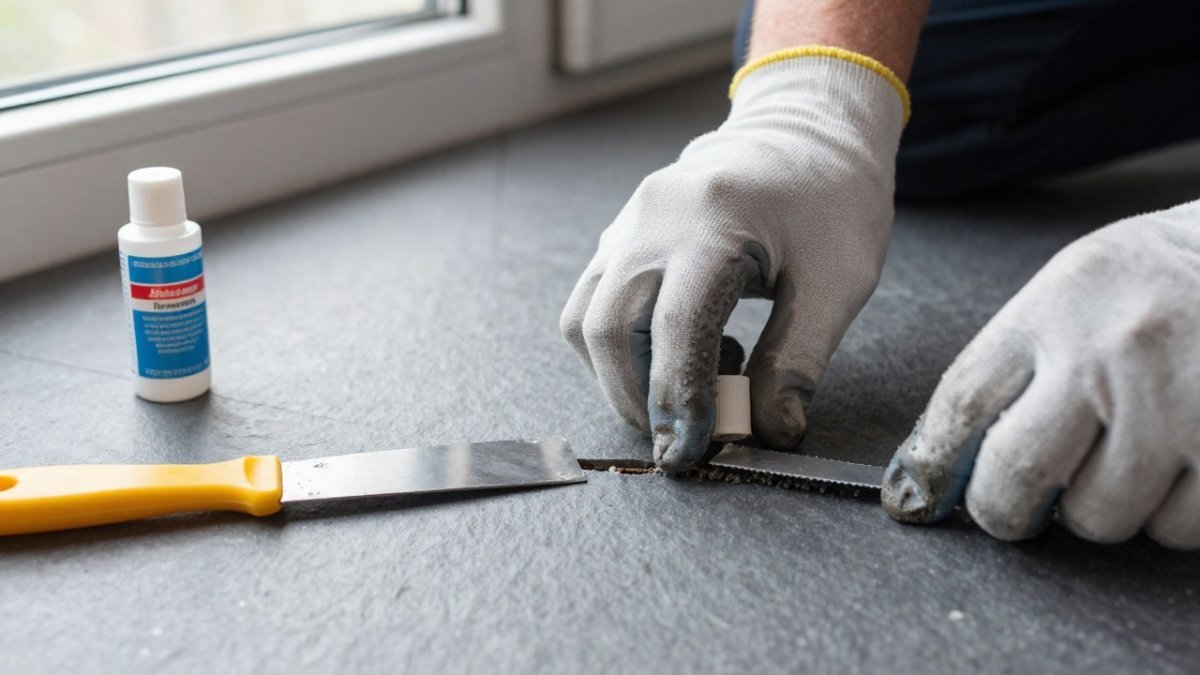
- Clean the crack. Use a stiff brush and a shop vacuum to remove dirt and dust. Wipe with denatured alcohol and let it dry completely. Filler will not bond to a damp or dusty crack.
- Mix the filler. Follow the label exactly. Mix only what you can use within the working time, which is often 5 to 15 minutes for epoxy. Mixing in a small paper cup makes it easier to control the ratio.
- Apply the filler. Press it into the crack with the putty knife. Work from one end to the other so no air pockets form. For deep cracks, fill in thin layers and let each layer cure before adding the next.
- Smooth the surface. Scrape off the excess while the filler is still soft. A plastic putty knife leaves fewer scratches than a metal one.
- Let it cure. Allow the full cure time shown on the label. Don’t rush this step. Sanding or sealing too early traps solvent and weakens the patch.
- Sand lightly. Use fine sandpaper to level the repair with the surrounding stone. Sand in small circles and check the level with your fingertips as you go.
- Clean up. Vacuum the dust, wipe the tile with a pH-neutral cleaner, and remove the painter’s tape before the filler fully hardens on it.
- Seal the repair. Apply a penetrating sealer across the repaired area and the tile around it. Wait the full cure time first.
Watch out: applying sealer before the filler has fully cured can trap moisture and leave a cloudy finish. Wait the full cure time.
How Long the Repair Lasts
A well-prepped repair in a stable tile commonly holds for years, but its life depends on the cause of the crack. An impact crack in a sound tile, filled with epoxy and sealed, is the most durable DIY repair. A crack over a moving subfloor or a tile that has delaminated will often reopen within months no matter how carefully it is filled.
Troubleshooting Different Types of Cracks
- Filler shrinks or pulls away: The crack was not cleaned well enough, or the filler was applied too thickly. Clean, dry, and refill in thinner layers.
- Color looks wrong: Test again on a scrap piece. Adjust the colorant gradually.
- Crack keeps reopening: The subfloor may be moving. Check the underlying structure before repairing again.
The steps below sum up the repair process, with the timing the article gives for each stage.
| Step | What to do | Time or frequency |
|---|---|---|
| Clean the crack | Brush, vacuum, wipe with denatured alcohol | Let dry completely |
| Mix the filler | Follow label; use within working time | 5-15 minutes for epoxy |
| Apply the filler | Press in; thin layers for deep cracks | Cure each layer before next |
| Let it cure | Allow full label cure time | 24 hours for epoxy; 24-72 hours for stone filler |
| Sand lightly | Fine sandpaper, small circles | After full cure |
| Seal the repair | Penetrating sealer on repair and surrounding tile | After full cure; resealing every 1-3 years |
Sealing Your Slate Floor After the Repair
Sealing protects the repair and the rest of the floor. Use a penetrating sealer made for natural stone, and apply it according to the label. Most floors need a fresh coat every one to three years, depending on traffic. High-traffic entryways wear faster and need more frequent sealing.
Keep the floor clean with a pH-neutral stone cleaner. Harsh acidic cleaners can etch slate and weaken the sealer.
Booking a Slate Repair Assessment With Johnny Stone Work
If the damage looks bigger than a simple DIY fix, Johnny Stone Work can assess it in person. Johnny Stone Work restores marble, slate, and granite for residential and commercial clients across the NYC area, including Long Island, Brooklyn, and Astoria.
Pricing depends on quantity, dates, and delivery, so visit our website for current prices or to request a free estimate.
Johnny Stone Work has 163 happy customers. Call a marble contractor today for a free estimate.
Frequently Asked Questions
Can a cracked slate tile be repaired without replacing it?
Yes, many cracked slate tiles can be repaired without replacement. Hairline cracks and small chips can usually be filled with a color-matched epoxy or stone filler, then smoothed and sealed. Cracks that run fully through the tile, that are spreading, or that have caused the tile to rock or delaminate usually need the tile replaced. A quick check is to press on either side of the crack: if the tile moves or flexes, replacement is the safer long-term fix.
What materials do you need to repair a cracked slate tile?
A basic slate tile repair kit typically includes a two-part epoxy or stone filler, color pigments or colorant for matching, a plastic putty knife, fine sandpaper or a sanding block, a stiff brush, painter’s tape, and a clean microfiber cloth. You will also need isopropyl alcohol or a mild degreaser for cleaning, and a sealer rated for natural stone once the repair has cured. Work gloves and eye protection are recommended, especially when mixing epoxy or sanding.
How do you make a slate tile repair blend in?
Start by testing your filler on a scrap or in a hidden corner, since slate varies widely in color and texture. Mix small amounts of pigment into the epoxy until it matches the surrounding tile when dry, because wet filler often looks darker than it will cure. Apply the filler slightly proud of the surface, let it cure fully, then sand it flush and polish lightly. A final coat of sealer will help the repair blend with the rest of the floor.
Can WD-40 damage or stain slate?
WD-40 is not recommended for slate. It is an oil-based product that can leave a residue, darken the stone, and attract dirt, which makes the surface look worse over time. It also does not bond with epoxy or sealers, so it can interfere with a repair. Use a pH-neutral stone cleaner or warm water with a small amount of mild dish soap to clean slate before and after repairs.