Last Updated: November 6, 2026
Quick Summary
To repair chipped slate entryway tiles, first check the chip’s size, depth, and whether the tile is still firmly bonded. Small, shallow chips on a firm tile can be filled and sealed yourself, while loose or cracked tiles need stabilizing or replacing first.
- Press gently on the tile; any rocking or hollow sound means it may be loose from the subfloor.
- Fingernail-sized chips are usually easy to fill, while chips removing a corner need more work.
- Use two-part epoxy filler for shallow chips and a stiffer epoxy putty for deep chips.
- Wait the full cure time, usually 24 hours, before sanding the filled chip flush.
- Seal the repair with a thin coat of penetrating sealer over the patch and surrounding tile.
Table of Contents
- Assess the Chip Before You Start: Size, Depth, and Tile Stability
- Materials, Tools, and Choosing a Slate Tile Repair Kit
- Prepare the Area and Clean the Chipped Edge Safely
- Fill, Match, and Finish the Chip Step by Step
- Repairing Slate Floor Tiles That Are Loose or Cracked
- What a Professional Repair Costs and How to Plan Your Next Step
- Frequently Asked Questions
Assess the Chip Before You Start: Size, Depth, and Tile Stability
Repair chipped slate entryway tiles by first checking the chip’s size and depth and whether the tile is still firmly bonded.
Run your fingers along the chipped edge and feel for sharp, jagged spots that can cut hands and snag shoes.
Check three things:
- Size: Small chips the size of a fingernail are usually easy to fill. Larger chips that remove a corner need more work.
- Depth: A surface-level chip only takes off the top layer. A deep chip that exposes a crack or the backing needs a stronger filler.
- Stability: Press gently on the tile. Any rocking or hollow sound means it may be loose from the subfloor.
A shallow chip on a firm tile is a weekend job. A deep chip on a loose tile should be stabilized first.
When a Chip Can Be Repaired and When to Replace the Tile
Repair the chip if the tile is firmly set, the crack has not spread across the whole piece, and the chip is small enough to fill cleanly.
Keep a few spare tiles from the original installation if you have them. A matching spare makes replacement much easier.
Use this quick guide to decide whether a chip is a simple fix or needs more work.
| Check | What to look for | Result |
|---|---|---|
| Size | Fingernail-sized chip | Usually easy to fill |
| Size | Chip removing a corner | Needs more work |
| Depth | Only the top layer chipped | Surface-level chip |
| Depth | Exposes a crack or backing | Needs a stronger filler |
| Stability | Rocking or hollow sound | Stabilize before repair |
| Stability | Firm when pressed | Repair is a weekend job |
Materials, Tools, and Choosing a Slate Tile Repair Kit
Core tools
- Putty knife or small plastic spatula (a plastic one scratches less on cleft slate)
- Painter’s tape
- Fine sandpaper or a sanding sponge (220 grit)
- Stiff brush and a vacuum with a brush attachment
- Mild pH-neutral stone cleaner
Repair materials by damage type
- Shallow surface chip on a firm tile: two-part epoxy filler or a slate repair kit with pigments.
- Deep chip exposing the backing or a hairline crack: a stiffer epoxy putty rather than a runny filler, so it stays in the void without sagging.
- Chipped edge at a grout joint: epoxy filler plus matching grout for the joint itself. Do not bridge the joint with filler.
- Loose or hollow-sounding tile: a stone-rated tile repair adhesive, not filler. Filler cannot re-bond a tile to the subfloor.
- Color and texture matching: dry mineral pigments or a tinted repair kit. Cleft slate varies across a single tile, so plan to blend two shades rather than chase one exact color.
Matching the product to the slate finish
Natural cleft slate has a rough, layered surface; honed or gauged slate is smoother.
Choosing a slate tile repair kit
A kit usually bundles epoxy, pigment, a mixing stick, and a small spatula, often cheaper than a full tube of specialty epoxy plus separate pigments.
Watch out: Do not substitute sanded grout for epoxy filler in a chip, since grout is not designed to fill chips in a high-traffic threshold.
Prepare the Area and Clean the Chipped Edge Safely
Clean the area before any filler goes on.
Wear gloves and safety glasses. Slate dust is fine and sharp, so keep it out of your eyes and lungs.
- Clear the entryway and lay down a drop cloth.
- Vacuum the chipped area and the joints nearby.
- Wipe the surface with a mild, pH-neutral cleaner. Let it dry completely.
- Use painter’s tape to mark the edge of the chip so the filler stays inside the damage.
Lightly smooth any sharp, jagged edges with a sanding sponge, removing loose fragments without grinding away more tile.
Dry, clean surfaces give the best results. Avoid power sanding indoors, because the dust spreads quickly and is hard to clean.
Call a marble contractor today for a free estimate! →
Fill, Match, and Finish the Chip Step by Step
Here is the full process, from filling to sealing:
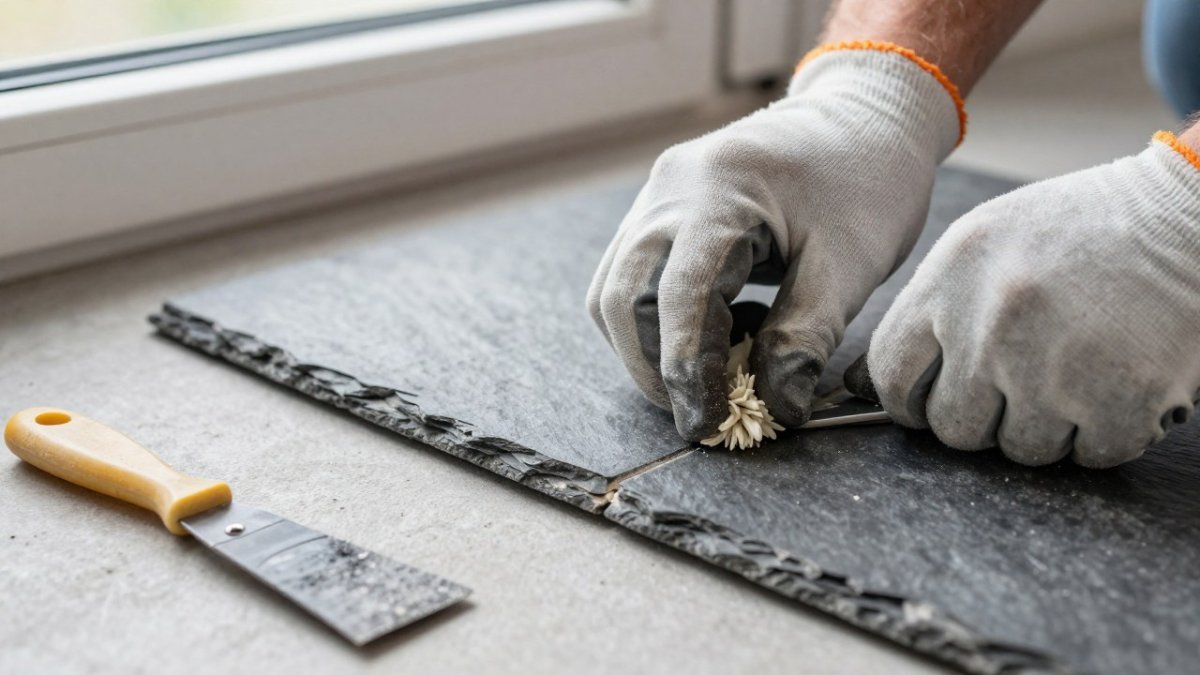
- Mix the filler. Follow the kit’s directions. Mix only what you can use in about 15 minutes.
- Test the color. Dab a little on a scrap piece or a hidden spot. Let it cure to see the true shade, since it often looks darker when wet.
- Fill the chip. Press the filler into the chip with a putty knife. Slightly overfill it so you have material to sand down.
- Let it cure. Wait for the full cure time on the label, usually 24 hours. Rushing this step weakens the bond.
- Sand flush. Use fine sandpaper in light, circular strokes until the filler sits level with the tile.
- Seal the repair. Apply a thin coat of penetrating sealer over the repair and the surrounding tile. Wipe off any excess.
Watch out: Do not sand a cured epoxy patch with a power tool. It can heat the filler, smear the color, and leave a bump you cannot fix.
For a natural-looking finish, blend the filler color with a little dry pigment if the kit’s shade is slightly off. Work in small amounts to keep the match close.
Repairing Slate Floor Tiles That Are Loose or Cracked
If the tile rocks, sounds hollow, or has a crack running through it, a surface fill will not hold.
Confirm the tile is loose
Reset a loose tile
- Cut the grout joints around the tile with a manual grout saw, working slowly so you do not chip the neighboring tiles.
- Slide a flat pry bar or stiff putty knife under one edge and lift gently. Slate splits along its layers, so pry in small increments and keep your hands clear of the edges.
- Scrape the old adhesive off both the tile back and the subfloor with a putty knife. Vacuum the dust.
- Apply a stone-rated tile repair adhesive in a full bed, not dabs at the corners.
- Press the tile down, check it sits level with its neighbors, and weight it with a board and heavy objects until the adhesive cures per the label.
- Re-grout the joints after the adhesive sets, then seal.
Replace a cracked or broken tile
- Score and remove the grout around the tile.
- Break the tile out from the center with a chisel and hammer, working toward the edges so you do not lever against neighboring tiles.
- Chip out the old adhesive and scrape the subfloor flat. A flat substrate is what keeps the new tile from rocking.
- Dry-fit the replacement tile and check the height against its neighbors.
- Set it in a full bed of stone-rated adhesive, weight it, and let it cure.
- Grout and seal to match the surrounding floor.
Low-dust removal at an entryway
Cutting and breaking slate releases fine silica dust, and an entryway spreads it through the house.
Entryway-specific cautions
At a threshold, the tile edge is often unsupported, which is why chips and cracks start there.
Watch out: Prying a slate tile with a single hard lever can snap the neighboring tile as well.
What a Professional Repair Costs and How to Plan Your Next Step
Repair costs depend on the size of the damage, how many tiles are involved, and whether a tile needs full replacement. Check Johnny Stone Work for current prices or a quote before you commit to a plan.
If you are weighing a DIY fix against hiring help, consider the risk. A loose or cracked tile in a high-traffic entryway is often worth having a professional look at. Request a free estimate from Johnny Stone Work to compare your options before you decide.
If you need help with a broader stone job, find a marble repair specialist who can assess the whole floor.
Frequently Asked Questions
Can you fix a chipped tile without replacing it?
Yes, many small chips on slate tile can be repaired without replacement. A shallow chip on the edge or face can be filled with a color-matched epoxy or stone repair filler, then leveled and sealed. Replacement is usually the better choice when the tile is cracked through, the chip has spread, or the tile rocks underfoot because it is no longer bonded to the subfloor. Test the tile’s stability first by pressing on each corner before deciding.
Can slate be repaired?
Slate can be repaired when the damage is limited to surface chips, small edge losses, or hairline cracks. Filling the void with a two-part epoxy or stone filler and blending the color usually restores a clean appearance. Larger cracks that run across the full thickness of the tile, or tiles that are broken into pieces, generally need the tile removed and replaced to keep the floor safe and level.
What materials do you need to repair a chipped slate floor tile?
Most small repairs need a stone-safe epoxy or filler kit, a color-matched pigment or powder, painter’s tape, a putty knife, a foam brush, fine sandpaper, a stiff brush, and a stone sealer. A shop vacuum with a HEPA filter helps control dust during prep. For a loose tile, you will also need a tile repair adhesive rated for stone and a few weights or painter’s tape to hold the tile while it cures.
What should you avoid using on slate tiles?
Avoid acidic cleaners such as vinegar, bleach-based products, and harsh abrasives, since they can etch the surface and dull the natural finish. Do not use WD-40 or other petroleum-based lubricants as a cleaner or release agent, because they can leave a residue that interferes with epoxy and sealer adhesion. Use a pH-neutral stone cleaner and test any product on a hidden area first.